Understanding Nano Banana Pro
Nano Banana Pro is one of the most important tools for users who want quick and reliable AI-enhanced images. Before learning how to use nano banana pro, it’s helpful to understand what this model is and why so many people prefer it.
What Is Nano Banana Pro?
Nano Banana Pro is an advanced AI model designed for high-quality image enhancement and AI-driven image creation. It helps users improve clarity, lighting, texture, and overall visual detail with minimal effort. Many users who search for how to use nano banana pro are looking for a tool that can enhance images quickly while keeping the results clean and natural.
Compared with standard enhancement tools, Nano Banana Pro performs well with challenging inputs such as blurry photos, noisy textures, or low-light images. It can enhance real photos or generate new visuals based on text prompts, making it suitable for a wide range of creative or practical use cases.
Why Users Choose Nano Banana Pro for Image Generation
Users prefer Nano Banana Pro because it consistently produces detailed, balanced, and visually appealing images. When searching how to use nano banana pro, most users want a simple solution that works without complicated settings, yet still delivers professional-quality output. The model provides this balance by handling both enhancement and AI generation tasks smoothly.
Another reason people choose Nano Banana Pro is its flexibility. Whether you upload an existing photo or start with a blank prompt, the model can generate sharp textures, more accurate lighting, and cleaner edges. This makes it valuable for photography, design, marketing visuals, and content creation.
Nano Banana Pro is especially useful when you need clear details, natural contrast, and improved structure. Its performance helps users streamline workflows and achieve reliable results across different image types, from portraits to products and landscapes.
How Nano Banana Pro Works and What It Can Do
Before learning the steps of how to use Nano Banana Pro, it’s helpful to understand how the model actually works and what kinds of results it can produce. Based on Google’s official documentation, Nano Banana Pro is not just an enhancement tool - it is a full-featured image generation and editing model powered by Gemini 3 Pro.
AI Image Generation and Editing Capabilities
Nano Banana Pro offers advanced creative and technical control that goes far beyond simple image upgrades. Its core capabilities include:
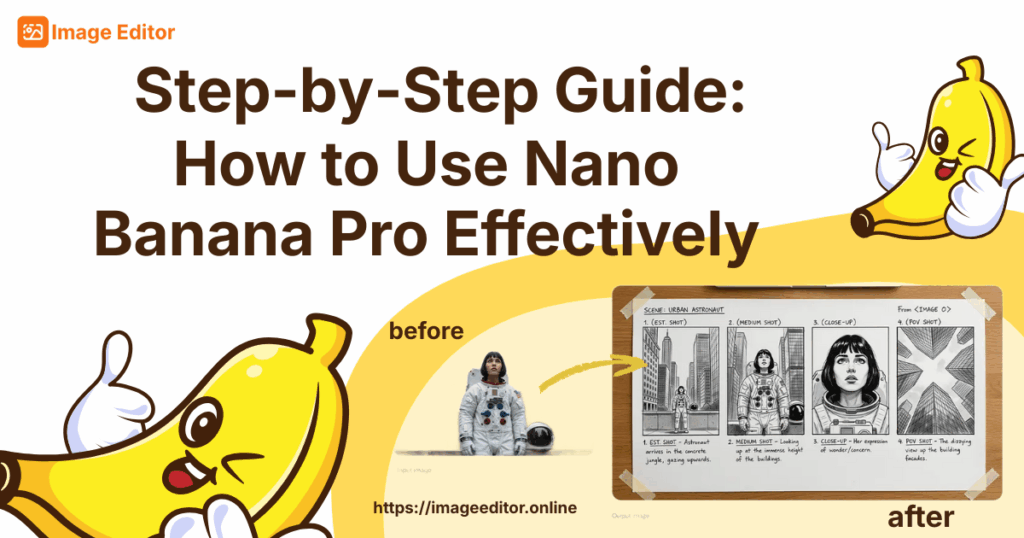
- Generating accurate, context-rich visuals With Gemini 3’s improved reasoning and world knowledge, the model can produce detailed images such as diagrams, storyboards, educational explainers, and other structured visuals.
- Creating images with correctly rendered text in multiple languages Nano Banana Pro can place readable, stylistically accurate text directly inside images. It supports multilingual text, making it useful for posters,mockups, branding assets, labels, and international content.
- Localized and fine-grained editing You can refine specific areas of an image - adjust lighting, change the subject’s focus, replace objects, modify weather, or alter stylistic elements — while keeping the overall composition consistent.
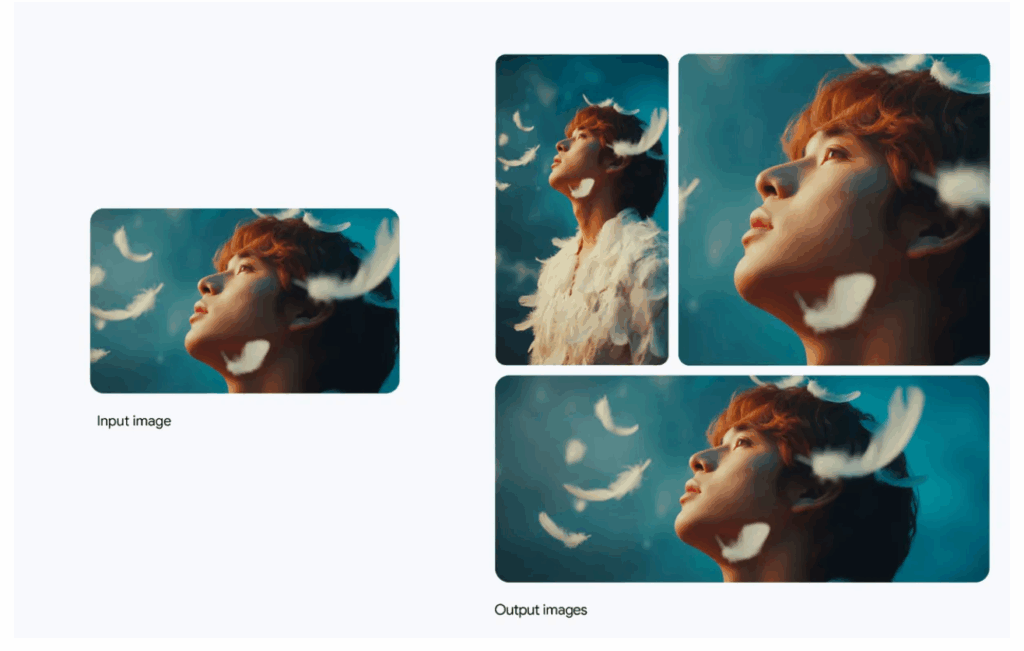
- Multi-image composition (up to 14 input images) The model can merge several input images into a single coherent scene and maintain the identity and appearance of up to five people. This is ideal for fashion editorials, group photos, product layouts, or conceptual art.
- High-fidelity results in 2K and 4K All outputs maintain stable details, consistent lighting, and clean structure, making them suitable for marketing, design, social media, and professional production.
Key Use Cases: Infographics, Storyboards, Multi-Image Scenes, and More
Based on Google’s official examples, Nano Banana Pro works well across many creative and professional tasks:
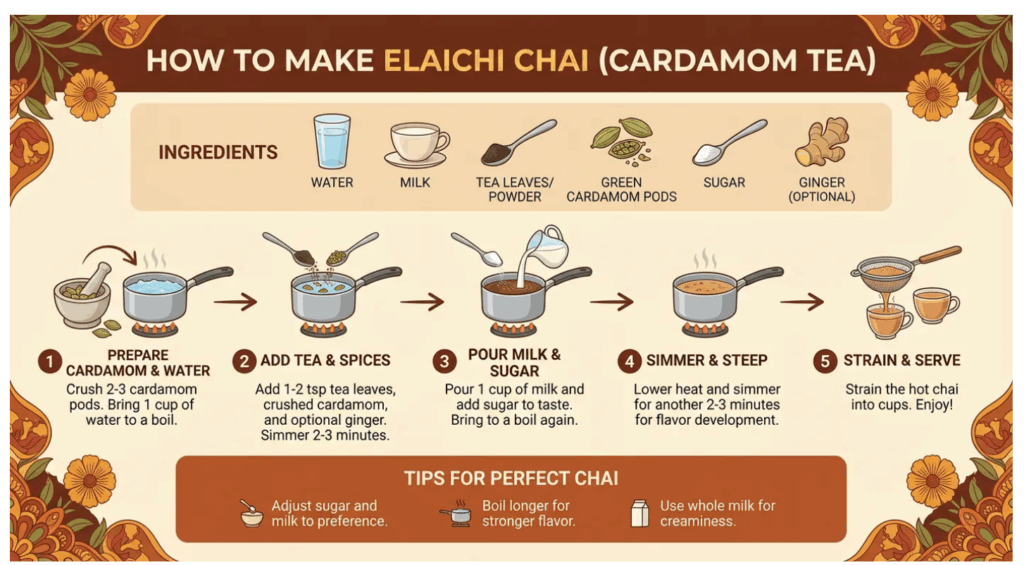
- Infographics and data-driven visuals
It can turn text or instructions into clear, structured visuals such as recipe diagrams, plant care charts, weather explainers, and educational graphics.
- Images with readable, accurate text
You can generate poster headlines, visualized typography, logo-style letterforms, or localized content in different languages.
- Multi-image composition and complex scenes
The model can combine multiple photos into a unified scene while preserving identity, proportions, and lighting. This makes it great for product scenes, editorial compositions, surreal landscapes, and cinematic visuals.
Nano Banana Pro supports:
- Changing depth of field or focal points
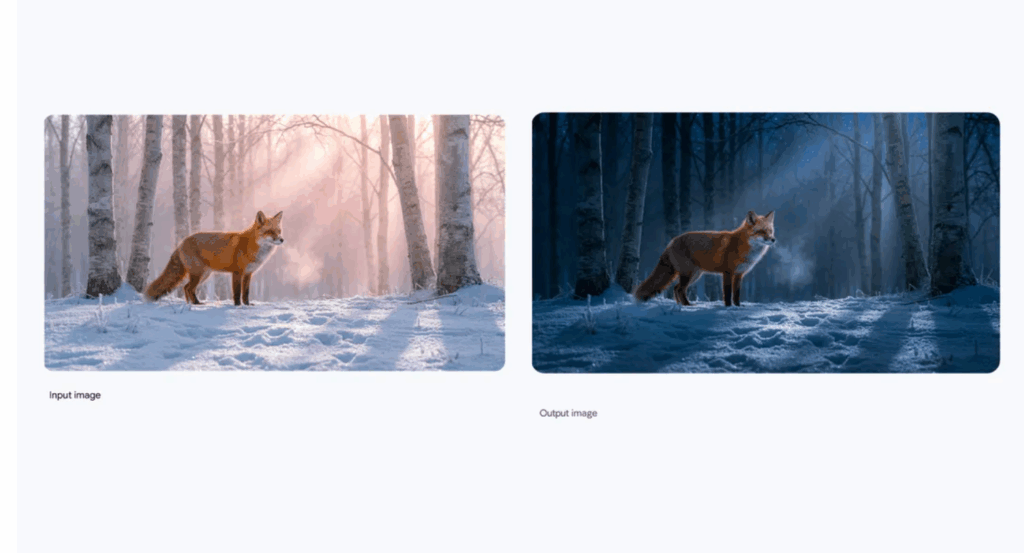
- Turning day into night
- Adjusting the camera angle
- Editing only a selected region
- Applying dramatic lighting effects
These tools give creators precise control over style, structure, and scene detail.
How to Choose the Right Enhancement or Generation Approach
Before moving into the full tutorial of how to use nano banana pro, it is helpful to know when this model should be used for enhancement and when it is better suited for image generation. Understanding this will help users choose the most effective method and avoid unnecessary retries.
When to Use Nano Banana Pro for Enhancement
Use Nano Banana Pro for enhancement when you already have an image that needs improved clarity, lighting, or detail. This includes situations where the photo looks slightly blurry, has uneven lighting, or lacks sharp textures. For many users searching how to use nano banana pro, this is the most common scenario. The model works well with real photos, product shots, and scenery images, delivering cleaner and more balanced results without extra editing steps. It is especially effective when you want a natural upgrade rather than a stylized change.
When to Use It for Image Generation or Style Creation
Choose Nano Banana Pro for image generation when you want to create a new visual from a text prompt or when you need a more creative outcome that cannot be achieved through enhancement alone. This includes concept art, stylized illustrations, or scenes that do not exist yet. Users learning how to use nano banana pro for creative work will benefit from the model’s ability to interpret prompts and generate consistent colors, smooth edges, and sharp details. It is ideal for artwork, content creation, and exploring new visual ideas without needing any original image.
Step-by-Step Guide: How to Use Nano Banana Pro on ImageEditor.online
This guide explains how to use nano banana pro on the actual interface shown above. The workflow is simple and clear, making it easy for anyone to generate or enhance images using the tool.
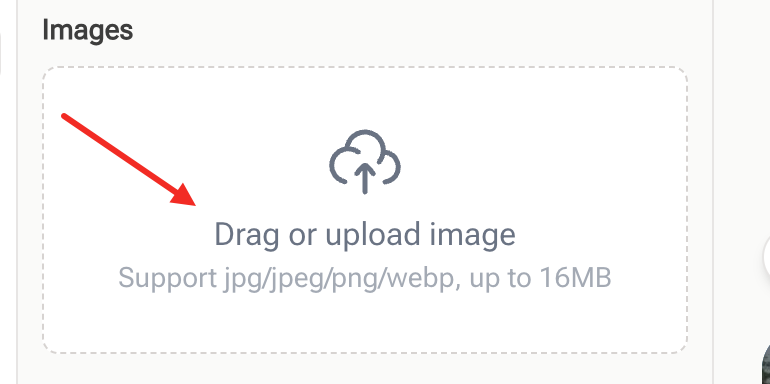
Step 1 - Upload Your Image
To begin, upload the image you want to edit by clicking the “Drag or upload image” area on the left side of the screen. This is the main entry point for using Nano Banana Pro, and it works with JPG, JPEG, PNG, and WebP files up to 16MB.
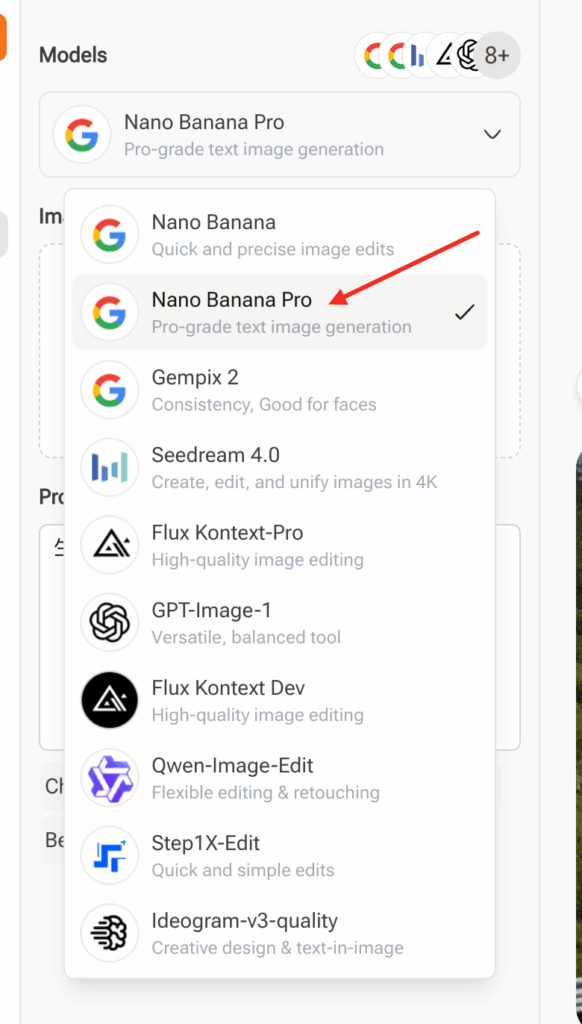
Step 2 - Select Nano Banana Pro Model
In the top-left section under “Models,” make sure “Nano Banana Pro” is selected. It is shown with a Google icon and labeled as a pro-grade image generation and enhancement model. Selecting it ensures your results use the latest AI capabilities. For users learning how to use nano banana pro, this is the most important step because the model controls output quality, clarity, and realism.
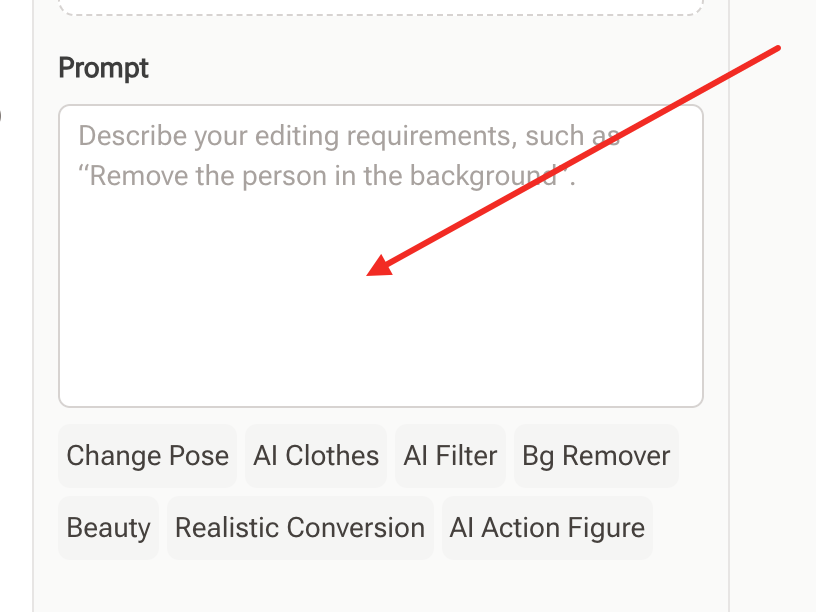
Step 3 - Enter Your Prompt
Below the image upload area, you will find a text field labeled “Prompt.” This is optional and depends on the result you want.
- If you uploaded a photo: leave it empty or write a simple instruction such as “remove background,” “brighten lighting,” or “apply AI filter.”
- If you are generating an image without uploading one: enter a clear prompt describing what you want the AI to create. such as create an infographic about plant focusing on interesting information. This step helps users understand how to use nano banana pro for both enhancement and creative generation.
Step 4 - Download and Save Your Final Output
Once your settings are ready, click the orange “Generate” button at the bottom-left. The AI will process your image or prompt and display the result on the right side of the screen. Review the output, and if you are satisfied, download it directly. This completes the basic workflow of how to use nano banana pro for fast, high-quality image creation or enhancement on ImageEditor.online.
How to Evaluate Whether Nano Banana Pro Produced the Best Results
After completing the basic workflow of how to use nano banana pro, it is helpful to quickly check whether the final image meets your expectations. A simple evaluation makes it easier to decide if you should keep the result or adjust it using another prompt or setting.
Checking Lighting, Texture, and Naturalness
Look at the lighting first to see whether it appears balanced and realistic. Nano Banana Pro usually fixes uneven brightness automatically, but it is still good to confirm that shadows and highlights look natural. Next, check the overall texture of the image. If the original photo was blurry or soft, Nano Banana Pro should make details clearer without introducing harsh artifacts. Users learning how to use nano banana pro typically look for clear edges, smooth gradients, and improved surface details. Finally, review the naturalness of the result. The image should look enhanced yet realistic, especially when editing portraits, product photos, or landscapes. Good results feel clean and refined without looking overly edited.
When to Reprocess or Modify Your Prompt
If the lighting still feels off, or textures appear too soft or too sharp, try generating the image again with a slightly different prompt. A short instruction like “increase clarity,” “more natural lighting,” or “softer details” can improve the output. Users who want to master how to use nano banana pro often reprocess images when they want a specific mood, a stronger enhancement, or a more creative interpretation. Small changes in wording can significantly affect the final image, especially when you are using the prompt field for stylistic guidance. If the result is close but not perfect, adjusting resolution or generating a second version can also help you find the best match.
Tips to Get More Professional Results Using Nano Banana Pro
Once you understand how to use nano banana pro and generate your first image, a few simple practices can help you achieve more consistent and professional results. These tips apply to both enhancement and AI generation.
Use Clear Source Images or Structured Prompts
If you upload a photo, choose an image that is sharp and well-composed. Clear subjects allow Nano Banana Pro to improve lighting, texture, and details more accurately. If you rely on prompts, keep them structured and specific. Short instructions such as “bright daylight,” “clean background,” or “more realistic colors” guide the model effectively. Users who want to master how to use nano banana pro usually get better results when they provide clear inputs.
Avoid Overexposed or Low-Resolution Inputs
Nano Banana Pro can enhance many image types, but extremely bright, washed-out, or very small images reduce the model’s ability to improve fine details. Avoid uploading photos with blown-out highlights or images that have been heavily compressed. For users learning how to use nano banana pro, starting with balanced and properly lit photos leads to cleaner, more natural results.
Improve Output with Small Post-Editing Adjustments
After generating your image, simple adjustments can further refine the result. You can make small changes such as increasing brightness, lowering contrast, or fine-tuning saturation in any external editor if needed. Most users who explore how to use nano banana pro find that tiny adjustments help match their preferred artistic style or branding needs without affecting the overall quality of the AI output.
FAQs About How to Use Nano Banana Pro
Do I Need a Prompt for Every Image?
No, you do not. If you upload an image and simply want enhancement, you can leave the prompt field empty. Nano Banana Pro will automatically improve clarity, lighting, and details. A prompt is only helpful when you want to guide the AI toward a specific edit or creative change.
What Images Work Best with Nano Banana Pro?
Images that are clear, properly lit, and not overly compressed work best. Nano Banana Pro performs well with portraits, product photos, and landscapes. Users learning how to use nano banana pro often see the best improvement when the original image has a stable composition and visible subjects.
Why Is My Result Not as Expected?
This can happen if the original image is too dark, too bright, or very low resolution. In these cases, the model may have limited information to enhance. If you used a prompt, try adjusting the wording to make it clearer. Small prompt changes often improve the output when using nano banana pro.
Is Nano Banana Pro Free to Use?
Yes, you can use Nano Banana Pro for free directly on ImageEditor.online. There is no sign-up required, and you can generate or enhance images with the model at no cost. This makes learning how to use nano banana pro easy and accessible for all users.
Conclusion: Why Nano Banana Pro Is an Effective Tool for AI Image Creation
Now that you understand how to use nano banana pro, it becomes clear why many users choose it for fast, high-quality image editing. The tool improves lighting, clarity, and details with just a few steps, making it suitable for both beginners and professionals.
Nano Banana Pro is also flexible. It works well for enhancing real photos and for generating new images using simple prompts. No advanced skills are required, and the clean interface lets you upload, edit, and generate results in seconds.
For anyone looking to create better visuals quickly, learning how to use nano banana pro offers an easy and reliable way to get clean, natural, and professional results every time.