
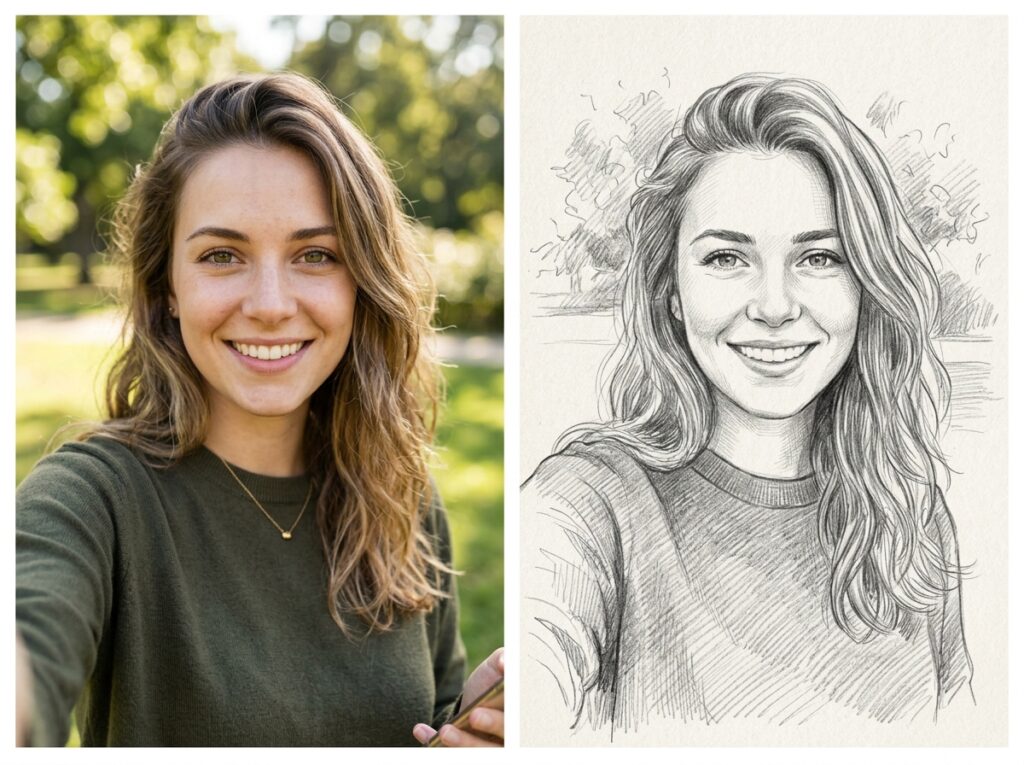
Turning a normal photo into a sketch might sound tricky, right? Especially if you’ve never held a pencil for drawing. But thanks to online AI tools, it’s actually super easy. Imagine you took a selfie at home, or snapped a quick picture of your pet, or even a product you want to showcase in your shop. In just a few clicks, you can turn that photo into a realistic sketch. In this guide, you’ll learn how to sketch a face from a photo quickly and without stress, even if you’ve never drawn a line in your life.
One of the easiest ways to do this is using Image Editor Online, specifically their AI Photo to Sketch feature. Upload your photo, let the AI work its magic, and you’ll see your photo transformed into a sketch almost instantly. It’s free, works online, and you don’t need any fancy software or skills. You can even try different styles and adjustments without worrying about messing it up.
By learning how to sketch a face from a photo, you’re not just getting a neat sketch—you’re saving hours you’d normally spend trying to draw manually. This is perfect for social media, personal gifts, or quick visuals for your small business. For example, a shop owner could take a customer photo, turn it into a sketch, and use it for a poster or a personalized thank-you card. Or you could make a cute sketch of your dog and share it online—it’s that simple.
Why Use AI to Sketch Faces
Sketching a face by hand usually takes a lot of practice. You have to understand facial proportions, shading, and light, which can be intimidating. AI does all the hard work for you. It detects the subject in your photo and generates a sketch that looks natural and accurate, even for tricky cases like curly hair, glasses, or pets.
Example: Want to create a sketch of a customer with curly hair? The AI automatically keeps all the details intact, no smudges, no extra erasing needed. Or if you’re trying to sketch a photo of a product, the AI outlines it perfectly so you can use it for marketing or online posts.
Other advantages include:
- Speed – Turn a photo into a sketch in seconds instead of spending hours drawing.
- Accessibility – Works on any device with internet, completely free online.
- Consistency – AI keeps proportions, lines, and shading accurate, even on complicated faces.
- Creativity – Experiment with different sketch styles or levels of detail to match your project.
With these tools, learning how to sketch a face from a photo isn’t scary at all. Even a complete beginner—or a street-side shop owner—can create a professional-looking sketch in minutes. AI tools like Image Editor Online make it fast, easy, and fun.
Step-by-Step Guide: AI First, Hand-Draw Insights
If you’ve ever wondered how to turn a photo into a sketch without struggling with pencils, this step-by-step guide is perfect for you. We’ll focus on AI tools first, with a little hand-drawing insight to help you understand what’s happening. Even beginners can follow along and get great results.
Step 1 – Upload Your Photo
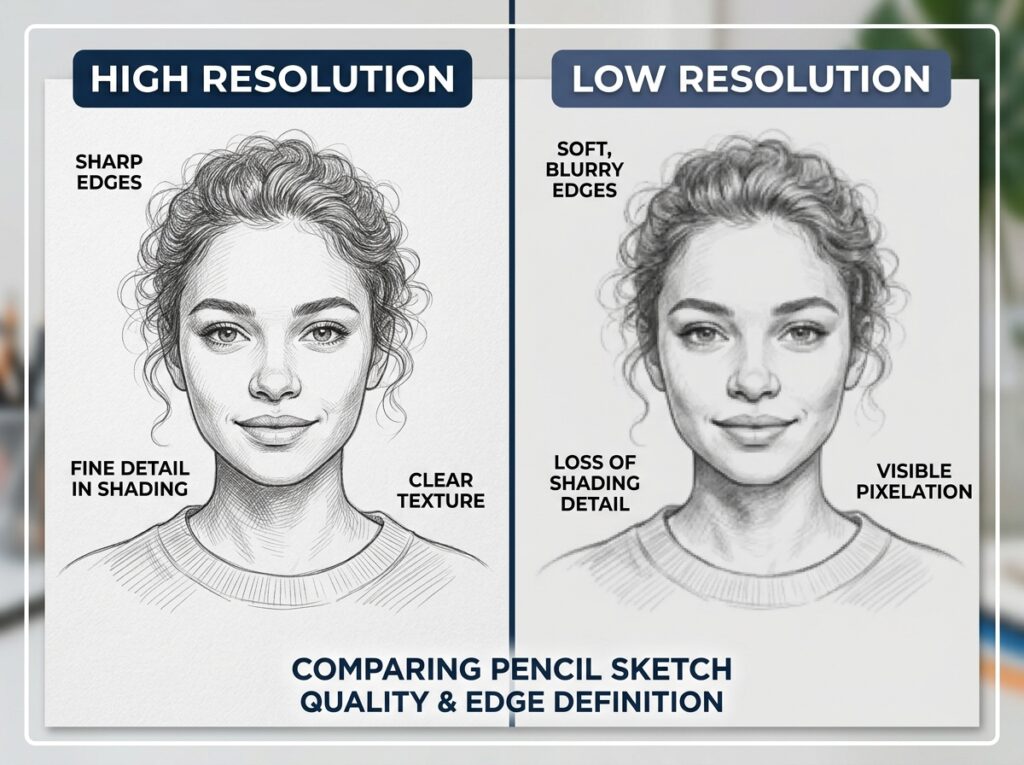
The first thing you need to do is open Image Editor Online and upload the photo you want to sketch. Make sure the photo is clear and high-resolution—AI works best with sharp details.
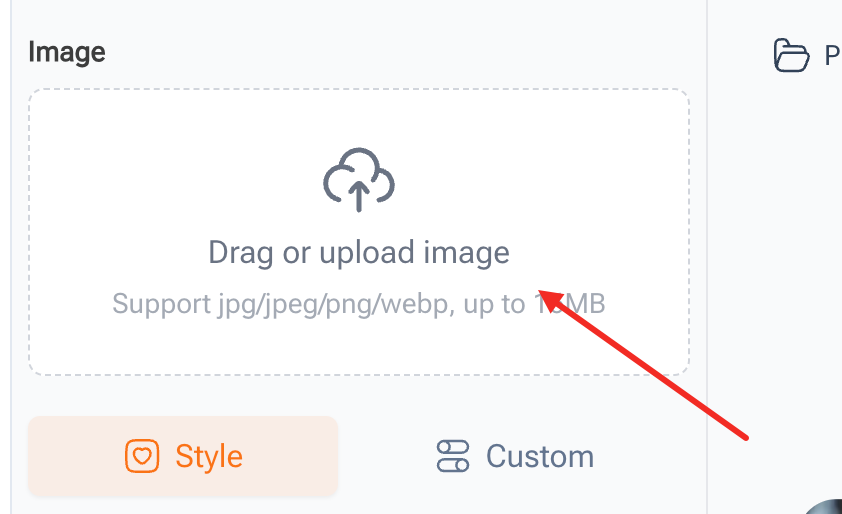
Example: If you’re turning a selfie into a sketch, pick a photo with good lighting. If it’s a pet or a product, make sure the main subject is visible and not cut off.
Tip: Avoid blurry or dark photos. Clear images make it easier for AI to detect facial features accurately. By starting with a good photo, you’re already halfway to mastering how to sketch a face from a photo.
Step 2 – Apply the Sketch Effect
Once your photo is uploaded, select the AI sketch feature. The tool will automatically detect the face and generate an outline. This is where the magic happens. The AI will create lines and shading that mimic real hand-drawn sketches.
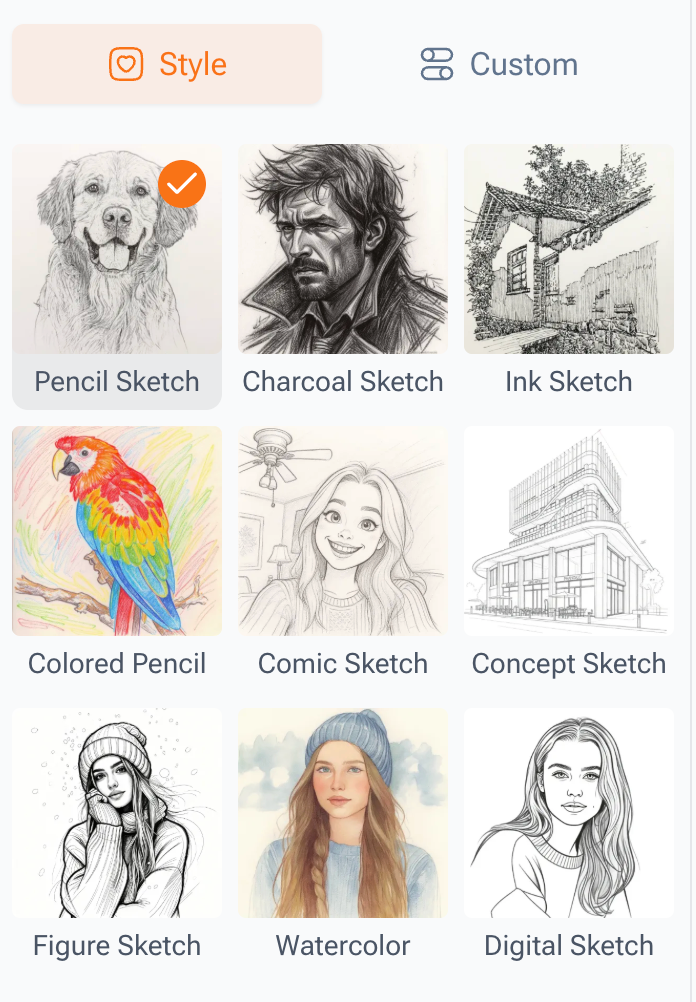
Hand-draw insight: Think of this as the “pencil outline” step in traditional drawing—the AI is essentially sketching the contours of the face for you. This step is important if you want to fully understand how to sketch a face from a photo.
Example: A photo of a dog will automatically have its fur outlined with fine lines. A portrait selfie will have facial features clearly marked.
Tip: Try different sketch styles if the tool offers them. Some AI options allow you to adjust the thickness of lines or the intensity of shading. This is another place to see how to sketch a face from a photo effortlessly.
Step 3 – Adjust Details
After the initial sketch is generated, it’s time to fine-tune. AI usually lets you adjust line thickness, shading, and contrast. You can enhance shadows, brighten highlights, or even smooth out edges for a cleaner look.

Hand-draw insight: Imagine adding small touches to a pencil sketch—darkening the eyes, adding subtle shading on cheeks, or enhancing hair texture. AI does this automatically, but you can tweak it to your liking. This step is important if you want to fully understand how to sketch a face from a photo.
Example: A customer’s portrait might need slightly darker lines around the eyes, or a product photo may require stronger contours to make it pop. With AI, these adjustments take seconds instead of hours.
Tip: Preview your edits regularly. Adjusting a few details can make your sketch look much more professional, showing exactly how to sketch a face from a photo in a polished way.
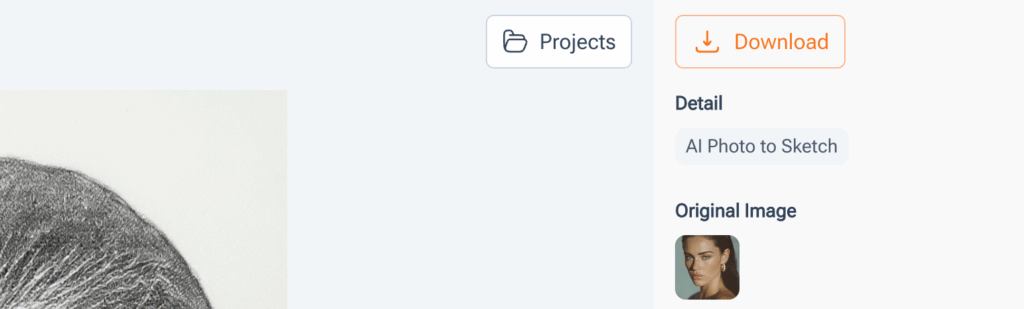
Step 4 – Preview and Download
Once you’re satisfied with the sketch, preview it to make sure everything looks natural. Then download your image. Most AI tools allow high-resolution downloads so you can print it, share it online, or use it in your projects.
Example: Turn a selfie into a sketch for social media, or a product photo for an online listing. Even small business owners can use this to make promotional materials without needing a designer.
Tip: Save multiple versions if you experimented with different styles or adjustments. This helps you compare and pick the one you like best. Using Image Editor Online, it’s easy to create several sketches from one photo quickly.
Extra Tricks:
For tricky faces, like curly hair or glasses, AI usually handles the details well, but you can manually refine edges if needed.
Try using simple prompts like “realistic pencil sketch” if the AI platform allows prompt input.
Experiment with backgrounds or leave them blank for a cleaner sketch.
By following these steps, anyone can learn how to sketch a face from a photo quickly and effectively. AI handles the technical part, and hand-draw insights help you understand the artistic choices behind the sketch. Even beginners or small shop owners can create professional-looking sketches in minutes.
Tips for Better Results
Now that you know the basic steps, there are some simple tips to make your sketches look even better. These are tricks that beginners, or even small shop owners, can apply to get polished, professional-looking results.
Use High-Resolution Photos
AI works best with clear and detailed images. The sharper the photo, the more precise the sketch will be.
Example: If you’re turning a customer portrait into a sketch, a high-resolution image will capture all the facial details like eyes, hair, and subtle shadows. Even a pet photo looks much better if the AI can detect fine fur textures. Using high-quality images makes a big difference when learning how to sketch a face from a photo.
Tip: Avoid blurry or poorly lit images—they make it harder for AI to create clean lines. Using good photos is one of the easiest ways to master how to sketch a face from a photo.
Consider Lighting and Shadows
Even with AI, lighting affects how the sketch looks. Photos with balanced light produce cleaner, more natural sketches.
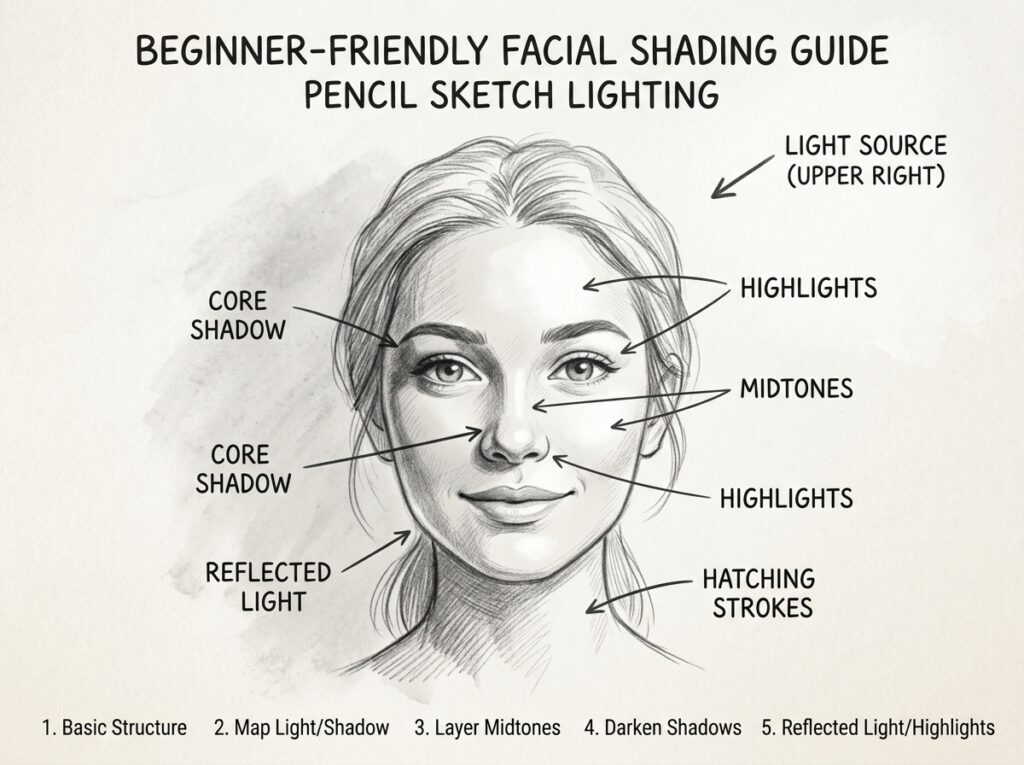
Example: A selfie taken in soft daylight will turn into a smoother sketch than one taken in harsh indoor lighting. Similarly, a product photo with clear light highlights contours and details better.
Tip: If your photo has uneven light, try adjusting it slightly before uploading. This small step can improve your sketch significantly.
Match Sketch Style to the Subject
Different photos work better with different sketch styles. You might want a soft pencil look for a portrait or a slightly darker, bold outline for a product.
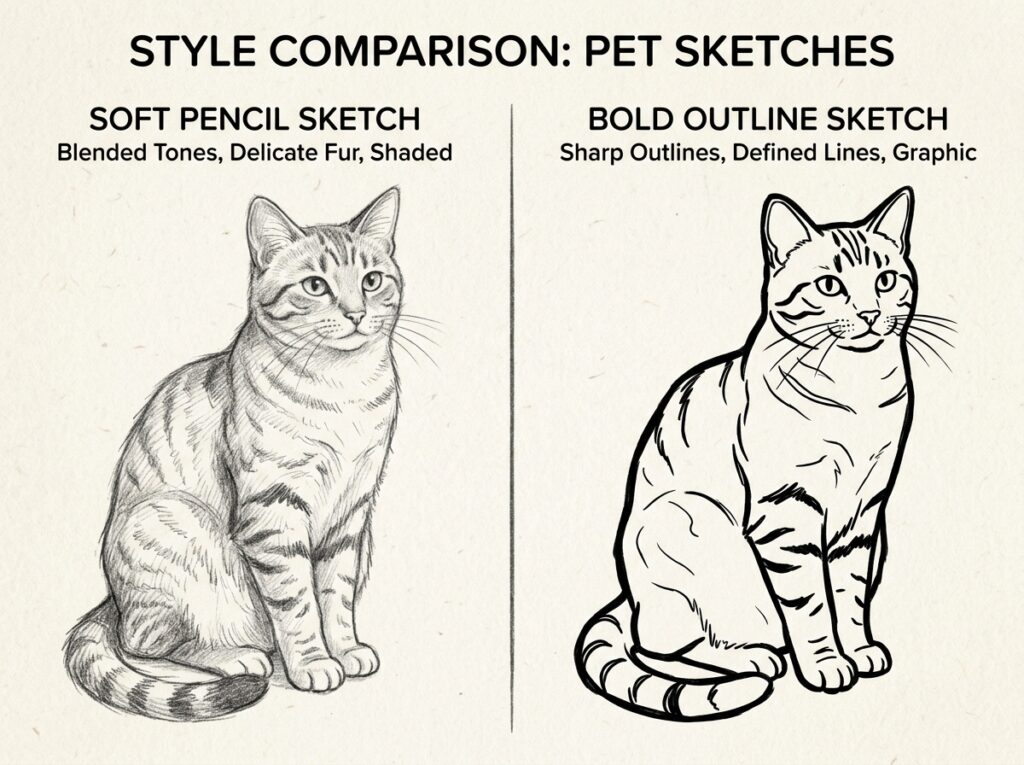
Example: For a pet photo, a softer pencil sketch preserves fur details. For a small shop product photo, a bold outline helps it stand out on flyers or social media posts.
Tip: Play around with the sketch intensity options. Most AI tools, including Image Editor Online, let you preview different styles instantly. This is a key tip for anyone learning how to sketch a face from a photo.
Optimize Edges and Fine Details
Sometimes AI might miss tiny details around hair, glasses, or intricate objects. Most tools allow you to refine edges manually or use AI-enhanced tools for better precision.
Example: If you have a curly-haired customer or a pet with fluffy fur, refining the edges ensures no awkward gaps appear in the sketch.
Tip: Zoom in and check the edges before finalizing. Small adjustments can make your sketches look more professional and polished.
Extra Design Tip:
Try adding a subtle background or leaving it blank for a minimalist look.
Experiment with multiple sketches from the same photo to find the most visually appealing style.
Use the sketch for social media, posters, or personalized gifts—AI lets you do it fast and free.
Following these tips will help you consistently create high-quality sketches. Once you get the hang of it, learning how to sketch a face from a photo will feel simple, fun, and creative—perfect for beginners and small business users alike.
Advanced Options for Custom Sketches
Once you’ve got the hang of the basic steps, you can explore some advanced AI features to make your sketches even more professional or creative. These options help you refine edges, experiment with styles, and get results that look like they were carefully hand-drawn—even if you’ve never touched a pencil.
Use AI for Edge Refinement
Sometimes, tricky details like curly hair, glasses, or fine textures in a pet’s fur can be tricky for AI to handle perfectly. Most tools, including Image Editor Online, offer automatic edge refinement to fix these areas. AI can refine edges automatically, making it easier to understand how to sketch a face from a photo with clean results.
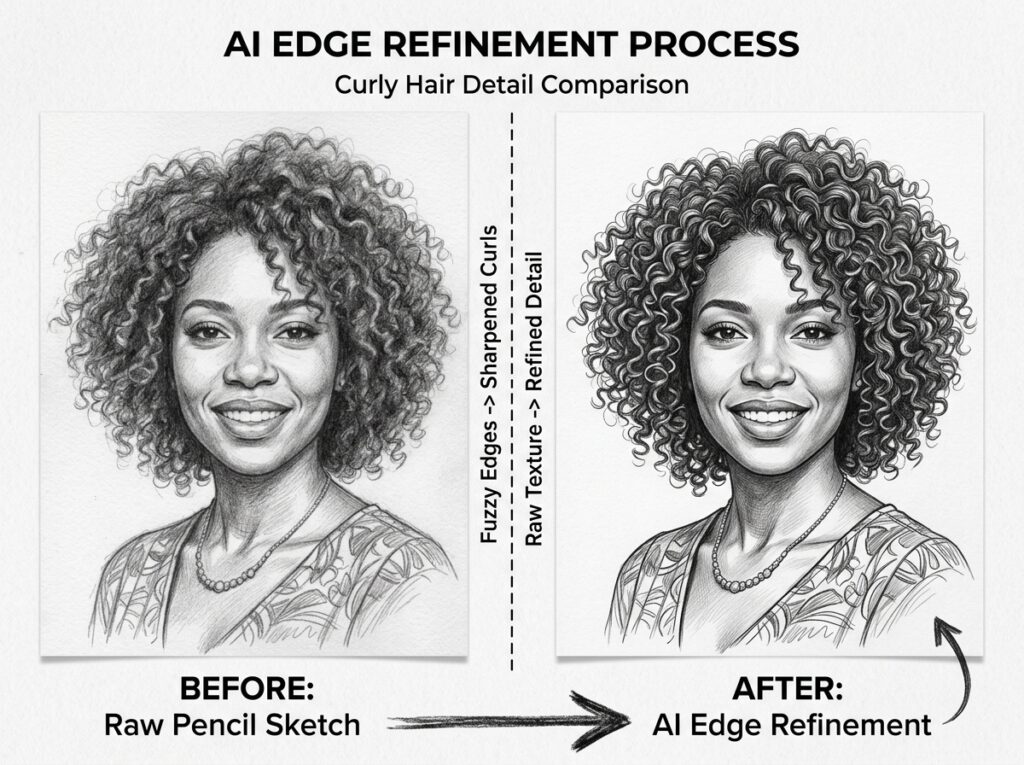
Example: A customer’s curly hair might have tiny stray strands that don’t appear clearly. AI can smooth the edges and make the sketch seamless. Or if you’re sketching a cat with fluffy fur, the AI ensures the outline stays natural and detailed.
Tip: Check the edges after AI processing and use refinement tools if necessary. This ensures your sketch looks polished and professional while still showing how to sketch a face from a photo clearly.
Experiment with Prompts and Styles
Some AI platforms allow you to enter simple prompts to generate different sketch styles. You can create a soft pencil look, a darker bold outline, or even a stylized artistic sketch. Using prompts is another smart way to explore different styles when learning how to sketch a face from a photo.
Example: Typing a prompt like “realistic pencil sketch with soft shading” can instantly change your portrait from a basic outline to a more detailed and lifelike sketch. For products, a prompt like “bold outline sketch for clear marketing visuals” makes them stand out.
Tip: Don’t be afraid to try multiple prompts. You’ll quickly discover which styles suit portraits, pets, or products best. Using Image Editor Online, you can preview multiple variations in seconds, which is a huge time saver.

Adjust Shadows, Light, and Details
Advanced AI tools can also adjust shadows and highlights, adding depth to your sketches. This makes the image look more three-dimensional and realistic.
Example: A selfie with soft daylight can look flat without shadow adjustments. AI can add subtle shading under the chin and around the eyes to make the sketch more natural. For product photos, adjusting light and shadow helps the object pop, giving it a professional look suitable for social media or online stores.
Tip: Preview before finalizing. Small adjustments to shadow and line intensity can transform an average sketch into a stunning one, demonstrating perfectly how to sketch a face from a photo.
Extra Tricks:
Try creating multiple sketches from the same photo to see different artistic styles.
Use gradients or minimal background effects to emphasize the subject.
Save high-resolution versions for printing or sharing online.
These advanced features let anyone, from beginners to small shop owners, create sketches that look like they were carefully hand-drawn. AI takes care of the technical work while you focus on creative choices. Once you explore these options, mastering how to sketch a face from a photo becomes fast, fun, and fully customizable. These advanced tools make how to sketch a face from a photo much easier and more flexible.

Conclusion
Turning a photo into a sketch is no longer difficult. With AI tools, anyone can learn how to sketch a face from a photo in just a few simple steps. You don’t need drawing skills—just upload your image, apply the sketch effect, and adjust the details.
Tools like Image Editor Online make the whole process fast and easy. Whether you’re working with a selfie, a pet photo, or a product image, you can quickly see how how to sketch a face from a photo works in real situations.
Keep experimenting with different styles and settings. The more you try, the better your results will look. Once you get used to it, how to sketch a face from a photo becomes a quick and useful skill for social media, personal projects, or small business use.